
|
|

|
|
|
|
Welcome to the Australian Ford Forums forum. You are currently viewing our boards as a guest which gives you limited access to view most discussions and inserts advertising. By joining our free community you will have access to post topics, communicate privately with other members, respond to polls, upload content and access many other special features without post based advertising banners. Registration is simple and absolutely free so please, join our community today! If you have any problems with the registration process or your account login, please contact us. Please Note: All new registrations go through a manual approval queue to keep spammers out. This is checked twice each day so there will be a delay before your registration is activated. |
|
|||||||
 |
|
|
Thread Tools | Display Modes |
 01-03-2008, 07:13 PM
|
#1 | ||
|
On 'L' Plates
Join Date: Jan 2008
Location: Thornlie Western Australia
Posts: 18
|
Another Modification to my LX WQ Auto.
Auto's unfortunatly dont come standard with the MP3 kit and i will be damded if i am paying $160 for a Ford dealer to do it. This is a simple Mod to do yourself however you need a few items to get started. Optional hot glue gun / Superglue. 20mm whole saw Four ford Audio keys (Ebay 8 pound 50) - $17AU Dont try to do this with only two or youll end up crying. 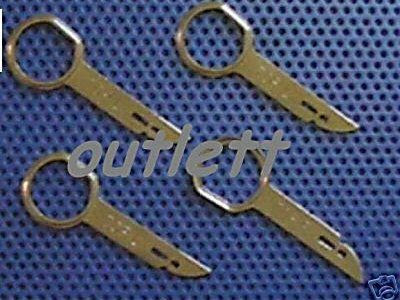 Ford Genuine MP3 Kit (Ebay 19 pound 70) - $41.40AU 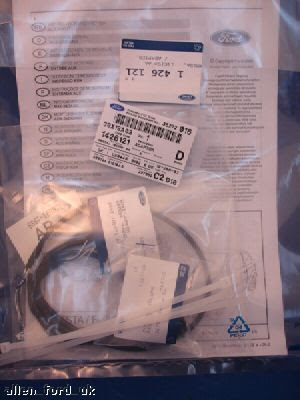 Your Audio system security key (dont start without this). Stage one Pull off the kick pannels on either side of your centre console. Their is only one screw in each pannel then they just unclip the other end pull outwards then down. Remove the cup holder surronding the Auto Gear lever. This section just lifts straight up. From the End of the Hand break you should be able to pull the top straight up. in the pics you can see the clips sourounding the Auto shifter. 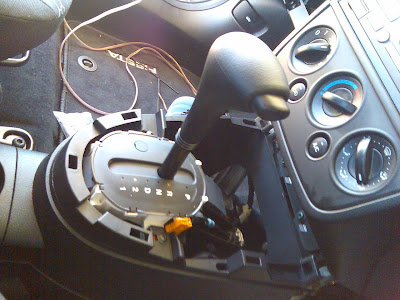 Next you need to place a template where you want it to go. and Tape off the sourounding area. Just incase the drill slips when you drill the hole. You need a 20mm drill i only had a 19mm which i think overall is a better choice as after you drill you have a bit of a burr on the edge which you have to file off.  Hole Drilled. 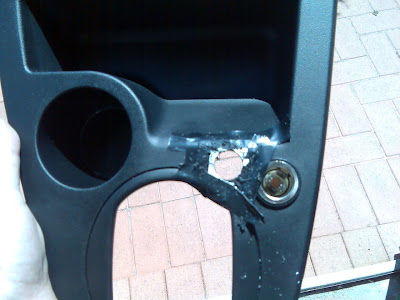 Reverse view. You can see the clearance here that you need from the 12 volt power outlet connection. I wasnt very happy with the fit ... if you push down too hard on your mp3 cable the fitting had a tendance to push in. Therefore a bit of hot glue locked this into position. 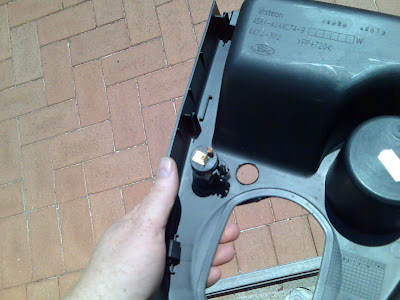 All fitted shown against the insturctions that come with the MP3 kit. They are not too bad butt are only relevent to a manual model. 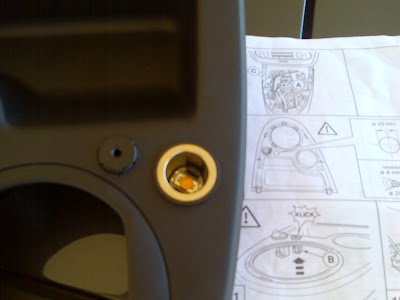 Close up view (very blury sorry) showing the poximity to the 12 volt power connector. 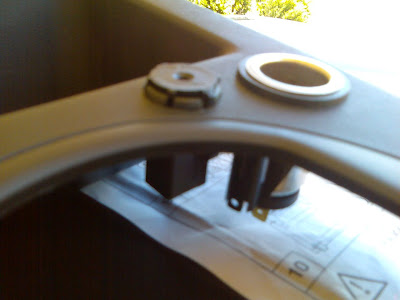 Ok Half way and the car looks like a bomb hit it. 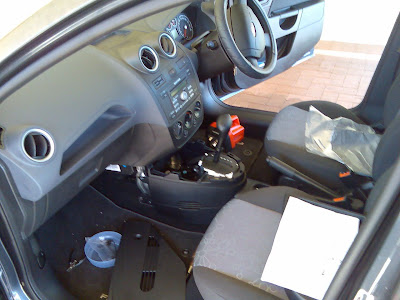 Next Insert all of your Audio keys into the four slots sourrounding the Audio player. Now the curved part of the key always faces towards the inside. 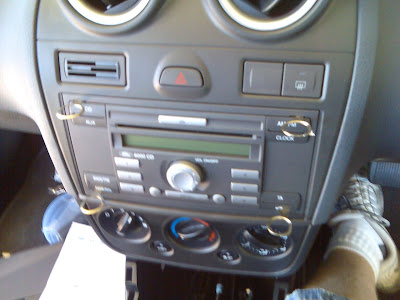 Ok pull the entire audio console out. I did one side at a time. ie Right top and bottom then left top and bottom. 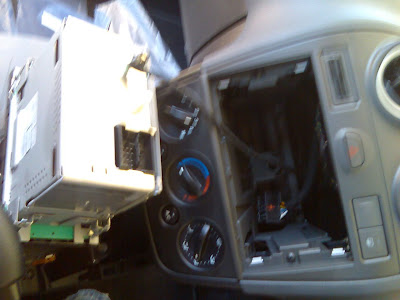 Sorry about the quality of the pics. alll done with my mobile phone. Some turn out ok some not so good. Now disconect the plug on the back it has a locking leaver action connection In this pic you can see the spot where the MP3 plug will fit Bottom Right of photo there is just a space there. 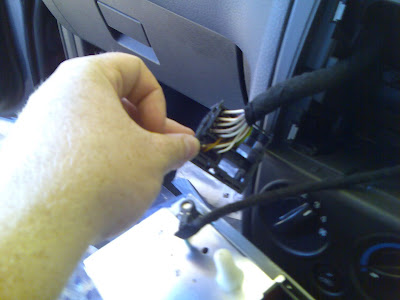 With the plug in place..... Dont worry the cable only plugs in the one location and only one way so you cant get this wrong.  Now run the cable though the back of the Audio hole and down one side. I followed one of the existing cables part way and zip tied it along the way. (zip ties came with the mp3 kit). 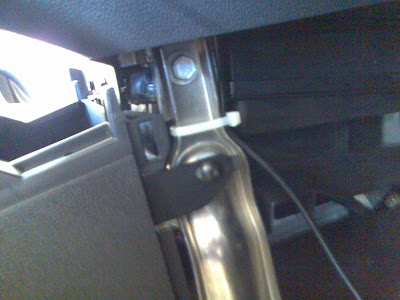 Now run the cable the rest of the way through the Shifter console. I clipped it to the 12 volt power socket cable ... Just make sure if doesnt get in the way of any moving parts. 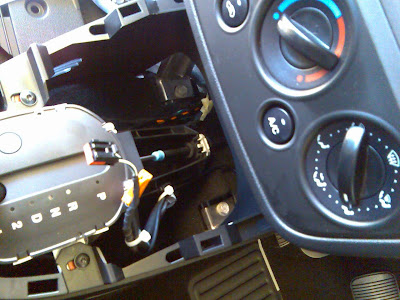 Next plug in the cable on the back of the mp3 socket and put the pannel back on.... just as you are lowering it make sure the cables dont get crimped against the shifter. 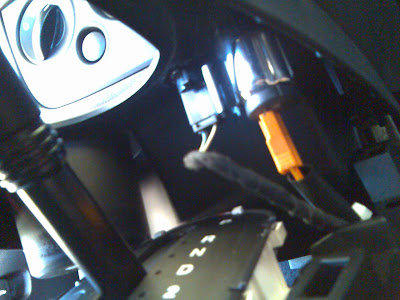 You will need to move the shifter arround from park to 1st gear and back to get the console section back into place. Now remember there are no screws for this just clips in as you push it down. Next plug it the Audio cable back into the Audio player here we can see the white mp3 plug locked into place in the audio cable. from this view it is bottom Left.  Now lock down the locking leaver on the audio clip and your done. Push the Player back into the dash. This took about two or three attempts for me as it seem to jam a cable behind the unit and make it not fit flush. Just remove the unit again, adjust the location of the cables and slip it back in. Thats it your done. Now power it back up and entre you Audio key to unlock it and enjoy.... Enjoy your mp3s the way all the Manual drivers have. Any question just ask. I tried to take as many pics as was possible sorry to all the 56Kps dial up guys. |
||

|

|
|
21-11-2008, 09:12 PM
|
#2 | ||
|
Solution Was Boost 4?, 6 & 8

Join Date: Dec 2004
Location: Melbourne
Posts: 23,624
  
|
Great tutorial I want to get this done on my wifes car, what is the part number for the Ford MP3 kit?
Also I will look at having this tutorial moved into Technical Resources Forum area.
__________________
[SIGPIC][/SIGPIC]
AUTOTECH TUNED EDELEBROCK CHARGED 2017 GT Mustang Plenty of RWKW |
||
|
|
|
|
21-11-2008, 10:16 PM
|
#3 | ||
|
FF.Com.Au Hardcore

Join Date: May 2006
Location: Brisbane
Posts: 1,053
|
Excellent write up, well done mate .....

|
||
|
|
|
|
23-11-2008, 01:08 PM
|
#4 | |||
|
On 'L' Plates
Join Date: Jan 2008
Location: Thornlie Western Australia
Posts: 18
|
Quote:
|
|||
|
|
|
|
29-12-2008, 09:58 PM
|
#5 | ||
|
Solution Was Boost 4?, 6 & 8
Join Date: Dec 2004
Location: Melbourne
Posts: 23,624
|
I got my cable from an ebay seller named g_m_production based in Italy post is slow and they don't have a reliable postal system, so take insurance if your buying one.
Cost was around $50 with shipping. Tomorrow off to the Ford dealer to take the head unit out and fit the wire.
__________________
[SIGPIC][/SIGPIC]
AUTOTECH TUNED EDELEBROCK CHARGED 2017 GT Mustang Plenty of RWKW Last edited by SpoolMan; 29-12-2008 at 10:37 PM. |
||
|
|
|
|
30-12-2008, 12:05 PM
|
#6 | ||
|
Regular Member
Join Date: Jun 2007
Posts: 175
|
spoolman that doesnt really look like the right one ?
|
||
|
|
|
|
30-12-2008, 07:54 PM
|
#7 | |||
|
Solution Was Boost 4?, 6 & 8
Join Date: Dec 2004
Location: Melbourne
Posts: 23,624
|
Quote:
Today I went to the Ford dealer they pulled the radio out or forward for me and at no cost, thank-you City Ford. I pulled the radio forward, plugged in the cable in the back of the loom, run the cable down the console, the whole job took 5 mins. No need to unplug radio, 1st get someone to hold the radio while you push in the mp3 plug into the loom at the rear, and no need to pull console apart with this cable, it plugs straight into my wife's iphone. 1st pic you can see where the cable comes out, from behind the cup holder plugs into the iphone. Once I got home looked in the letter box and the caddy I ordered of ebay had arrived. jobs done now. Cost, $50 for cable, $15 for caddy. Thank-you Rimwar for your thread it has been a really good source of information.
__________________
[SIGPIC][/SIGPIC]
AUTOTECH TUNED EDELEBROCK CHARGED 2017 GT Mustang Plenty of RWKW |
|||
|
|
|
|
31-12-2008, 02:04 AM
|
#8 | ||
|
Regular Member
Join Date: Jun 2007
Posts: 175
|
ohh yeah you just got the cable running, not the input next to the 12v socket, sorry thats why i thought it wasnt the right one.
|
||
|
|
|
|
31-12-2008, 08:30 AM
|
#9 | |||
|
Solution Was Boost 4?, 6 & 8
Join Date: Dec 2004
Location: Melbourne
Posts: 23,624
|
Quote:
__________________
[SIGPIC][/SIGPIC]
AUTOTECH TUNED EDELEBROCK CHARGED 2017 GT Mustang Plenty of RWKW |
|||
|
|
|
|
11-01-2009, 02:22 PM
|
#10 | ||
|
Starter Motor
Join Date: Dec 2008
Posts: 1
|
Ford part number is WQ 289455AA. Cost was about $57 from Dale Ford at Chullora. Rimwar, thanks heaps for the pics and the info mate. I'm about to install mine.
Cheers Mick. |
||
|
|
|


 Linear Mode
